Upgrading to an SSD
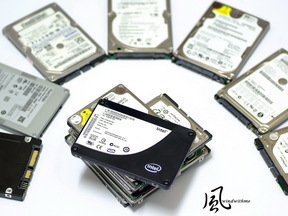
For all of those seeking the new frontier in performance, you'll find here the right way to install a new SSD in your Rig.
First of all, I'll answer the question in everyones mind, is it worth it?
Definitely yes, even an average SSD with no tweaks at all will perform better than a "RAID 0" 2 HDDs arrangement.
Some of the advantages are:
*Power consumption: only 1/2 or 1/3 of what a HDD uses -> longer battery duration
*Spin up time: As it doesn?t have any mechanical parts, an SSD is ready after being in Power save mode almost instantaneous
*Data access time: 1/5 - 1/10 compared to a HDD
*Read latency: 1/5 compared to an HDD = faster aplication launch times
*SSDs have no moving parts and make no sound
*A lack of moving parts virtually eliminates mechanical breakdowns
*No flying heads or rotating platters to fail as a result of shock, altitude, or vibration
*Almost no susceptibility to magnetic fields interactions
*The weight of flash memory and the circuit board material are very light compared to HDDs.
*Cooler operating temperatures
There are tons of benchs floating around the web, and it isn't my intention to cover this subjet too much, so if you are interested, check out the numbers by yourself.
Before the install instructions, a simple rule for everyone going for this upgrade.
A new SSD means a Windows Clean Install.-
Upgrading to an SSD will requiere a few windows tweaks and some things need to be disabled, so no image backups or restores will work, or if they do, your new SSD won't deliver as much as it could.
In alienware machines Alien Respawn DVDs won't work either since it won't let you restore your system in smaller drives.
So keep in mind:
SSD---->Clean Windows Install
Just copy all your important data to an external drive, dvds or the method you prefer.
*Install Instructions*
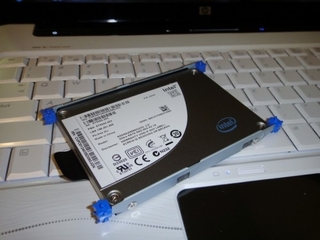
1.-Install SSD in place of HD that came with computer. For Alienware laptop users it's just a few screws removal and you are done. Place your new SSD the same way your old HDD was. In some cases you'll need to re-use an adapter connected to your old HDD.
2.-Enter BIOS SETUP. There you'll need to choose between RAID or AHCI for the mode. Select RAID in first place, if you start experiencing issues (like BSOD) then swap to AHCI.
3.-Power Off to make sure the BIOS change took effect.
Don't skip this step!
4.-Reboot with Windows 7 install disc or your custom WIN 7 install pendrive.
5.-Delete any existing partitions if they exist on your SSD. When all are deleted, then select the disk you want to use and click "Next".
6.-After Windows 7 is installed and your system has rebooted, then you should do the following immediately to optimize for SSD:
*Tweaks*
a)Disable Hibernate (SSDs boot fast so there is no need to ever hibernate)
Description: You may free up 1GB of space on the SSD if you have 1GB of memory, 2GB of space if you have 2GB memory. You will lose the hibernation feature which allows the equivalent of quick boots and shutdowns.
Instructions: Start Menu -> Type cmd -> Right-Click the cmd Icon -> Run as Administrator -> Type powercfg -h off -> Type exit
b)Disable the Page File
Description: Eliminate writing memory to the SSD, free over 2GB of disk space. Warning - If you run out of memory the program you're using will crash.
Instructions: Start Menu -> Right-Click Computer -> Properties -> Advanced System Settings -> Settings (Performance) -> Advanced Tab -> Change -> Uncheck Automatically manage -> No paging file -> Set -> OK -> Restart your computer
Alternatively, if you want to play it safer, you can set a custom size of 200MB min and max.
c)Disable indexing
Description: Indexing creates and maintains a database of file attributes. This can lead to multiple small writes when creating/deleting/modifying files. Searching for files will still work.
Instructions: Start Menu -> Right-Click Computer -> Manage -> Services and Applications -> Services - > Right-Click Windows Search -> Startup type: Disabled -> OK
d)Disable defragmentation
Description: Defragmenting a hard disk's used space is only useful on mechanical disks with multi-millisecond latencies. Free-space defragmentation may be useful to SSDs, but this feature is not available in the default Windows Defragmenter.
Instructions: Start Menu -> Right-Click Computer -> Manage -> Services and Applications -> Services - > Right-Click Disk Defragmenter -> Startup type: Disabled -> OK
e)Disable Write Caching
Description: There is no cache on the SSD, so there are no benefits to write caching. There are conflicting reports on whether this gains speed or not.
Instructions: Start Menu -> Right-Click Computer -> Manage -> Device Manager -> Disk drives -> Right-Click STEC PATA -> Properties -> Policies Tab -> Uncheck Enable write caching -> OK
f)Disable System Restore
Description: Don't write backup copies of files when installing new programs or making system changes. Can free up between a few hundred MB to a couple GB. Warning - Although unlikely, if a driver installation corrupts your system, there won't be an automatic way to recover.
Instructions: Start Menu -> Right-Click Computer -> Properties -> Advanced System Settings -> System Protection Tab -> Configure -> Turn off system protection -> Delete -> OK
g)Reboot. Then double check to see if only about 9GB is used in your SSD. If you are using more than this, then you probably didn't disable hibernate or move your pagefile off the SSD.
7.-Alienware users Install drivers in the following order:
1. Chipset Driver
2. USB 3.0 Driver (11xR3, 14x, 17xR3, 18x only)
3. Intel RST Driver / Intel Management Engine
4. Freefall Sensor Driver
5. Alienware On-Screen Display Driver
6. INTEL/AMD/NVIDIA Display Driver
7. LAN Driver
8. Wireless Network Driver
9. Audio Driver
10. Bluetooth Driver
11. Touchpad Driver
12. Media Card Reader Driver
13. Remote Control/Infrared Driver (Older systems - M15x, M17xR1/R2)
8.- Do Windows Update now and make sure you check repeatedly until all updates are installed. This will install .NET 4.0 which is required for Alienware Command Center.
9.- Install Alienware Command Center
10.- Disabled Freefall Sensor since you have an SSD. Open MSCONFIG and go to Start Up tab and uncheck "FF_Protection Application". (Only if you don't move your old HDD to another bay)


